Modern digital images have the benefit of huge plasticity: you can maintain detail in highlights (which was always the weak spot of the medium), work at much higher ISO sensitivities than the highest ISO color film would ever allow, and still have a high degree of color grading.
The digital medium’s plasticity, however, can either be its greatest merit, or it can end up becoming a convoluted open-ended field of possibility that can lead the photographer down a rabbit hole of endless tweaking.
This is exactly where the simplicity of film comes into play. A lot can be said about the beauty of working with the archetype medium, including the magic of a more sober approach to photography: there is a certain slowness required in order to properly expose a scene and the medium begs us to adopt a more conservative rate of shooting largely due to the cost of film. Then finally, there is something romantic in the fact that film “captures” the same light that lit the scene. If you think about it, the very light that lit the scene falls and forever “crystallises” on the emulsive (in fact, it is literally forms salt crystals).
Color Science
I find that the Color Science is often missing in discussions about why film is so important. The very colour science that has gone into designing films, especially by FUJI and KODAK, is truly an ingenious interplay of psychology and chemistry. A single sheet of film is the accumulation of tens of years of research in the psychology of perception.
Film is a beautiful medium, indeed! Yet, in today’s standards, film is also a poor technology: it is susceptible to X-Rays (especially the new CT scanners), prone to user error, it ages, takes up physical space, requires cold storage, and is sensitive to the elements. You cannot know if your images worked out until it is too late, and, unlike our dual SD card modern cameras, it has no backup.
Hybrid Photography
This is where Hybrid photography comes into play.
Hybrid photography is the process by which the photographer adopts a combination of either photographing film or digital where conditions are ideal for each medium, or photographs both in parallel. I tend to do the latter. I find that this process allows me to anchor my digital work on the look of the film scans. This involves a very nuanced and detailed process. I look at each color on the film scans and try to emulate it on my digital images. It takes a keen eye and experience, lots of time (copying the settings of one images onto another will rarely work, and the vast majority of images are in essence hand-painted individually) and it is an artform in its own right. This said, it is also a skill anyone can learn with plenty of practice.
With a hybrid workflow, the digital medium is no longer a world of endless possibility. There is a clear target: to make digitals look as close to the film scans as possible.
Film as Education
If you are a photographer enticed by the “film-look” there are presets and profiles that will map the colour palette of digitals towards the palette of film. For example, they will shift yellow-greens towards a more muted tone of blue-green. Yet, the devil is in the details and such profiles will do only 80% of the work. They are a great starting point and I am very thankful to the people who took the time to create these profiles. However, that remaining 20% relies on handcrafted, careful manipulation of tints, tones, shades and hues based on the reference film scans. This 20% is a degree of freedom that qualifies for the dynamics of a very complex adaptive system. Chemical crystals, angles, lenses, weather, temperature, light, user controls, scanning method, scanner operator’s aesthetics, all become entangled in a web too complex to ever predict or control. I can never anticipate the nuances of a film scan. A super computer running a complex simulation maybe could, but I doubt any human can anticipate the details on any film scan. I have never received scans without a sense of surprise! And, this is one of the things I love so much about film.
When I received my first ever professionally-photographed roll (I have been photographing film since childhood, but never paid much attention to it) I confess that I hated it. It was wonderfully exposed and scanned, but still, I needed to adjust my aesthetic. It was soft, lacking the crisp edges of my digital camera, colors seemed somehow unexpected. Today, all of these are the characteristics that I am looking for in my images! By my third or fourth roll, though, I got used how film looks. I grew to love it! One learns to let go, trust the medium, and retrain their expectations.
Therefore, I always advise photographers to get their hands on a film camera. Shoot in parallel with digital. Allow yourself to lose a bit of control, and simply be surprised. Go back to your computer and try to edit based on your scans. It is one of the greatest exercises there exists. Nowadays, whenever I purchase film (I spend several thousands on film every year – on rolls and processing), I categorise it under “Educational expenses”.
When I purchase film, I categorise it under “Educational expenses”.
FILM CAMERAS
If you are looking to start photographing film, here are some of my recommended cameras. There are three main types of film cameras to choose from:
- Medium Format
- Point and shoot
- 35mm SLR
Medium format (645)
The Pentax 645N
(paired with the 75mm FA autofocus lens)
645 stands for the size of each frame of film: 6cm by 4.5cm. As you can see, this is a significantly larger surface than most of the sensors available in mainstream digital cameras. This is also referred to as “120 format”. Medium format cameras were the professional choice 20-30 years ago, because lenses produced for medium format cameras were sharper, suffered from almost no vignetting, and the grain in images was very subtle.

The Pentax 645N is my favorite, most trusted medium format camera. It is also my Film Lab’s favorite camera! Robust, very well-designed, extremely easy to use, with very good AF, and most importantly: RELIABLE. Recently I was teaching a workshop in the French Riviera where temperatures reached over 110F, and many Contax 645 cameras overheated and stopped working while the Pentax 645N kept working like a champion. I have never seen enough difference in the images produced by the revered Contax 645 and the humble Pentax 645N to justify the over 3 times the cost. I personally value reliability the most, and I have never, ever felt artistically limited by my trusty Penax 645N. The only thing that takes a bit of getting used to is the loud shutter noice vs the very sweet Contax shutter noice.
A side note on the cost of classic cameras
When it comes to classic out-of-production cameras, the current price mark depends much less on the cost of production (since the units are no longer in production) and more on the supply-demand pressure. Limited supply may mean that some cameras were produced in smaller numbers than others, therefore there simply are fewer items to go around. Combine this with a steep demand, and prices spike. Demand correlates with the perceived status of a camera. When celebrities started using the Fujifilm Klasse its price almost doubled within a few months because of the high demand. Contax 645 became a status item thanks to its use by popular photographers, that much that it became synonymous to wedding photography. The Contax 645 kit was sold at 4000USD in 1999. Then, digital came out and its price dropped dramatically. Today a kit may cost up to USD5000-7000 (depending on whether you buy several film inserts, a Maxwell Brilliant Matte screen etc). Accounting for inflation, this is in fact similar to the price it was when it was first launched in 1999. A Pentax 645N kit was around 3000USD in 1999, and today you can get one for around 2000USD (including a few extra film backs), which can only be explained by the lower demand and higher supply. The Pentax 645, 645N and 645Nii used to be a very popular camera and also, it was out in 1997, while the Contax was out in 1999 (until 2005). The Contax was unlucky to have come out on the verge of the digital revolution and fewer copies were produced. Unfortunately the limited number of copies means that it is more expensive and that fewer spare parts exist for repairs. I predict that it will not be long before the price of the Pentax 645N increases steeply. As an example, its price already doubled in the last three years, and I expect it to keep on rising).
Point and shoot
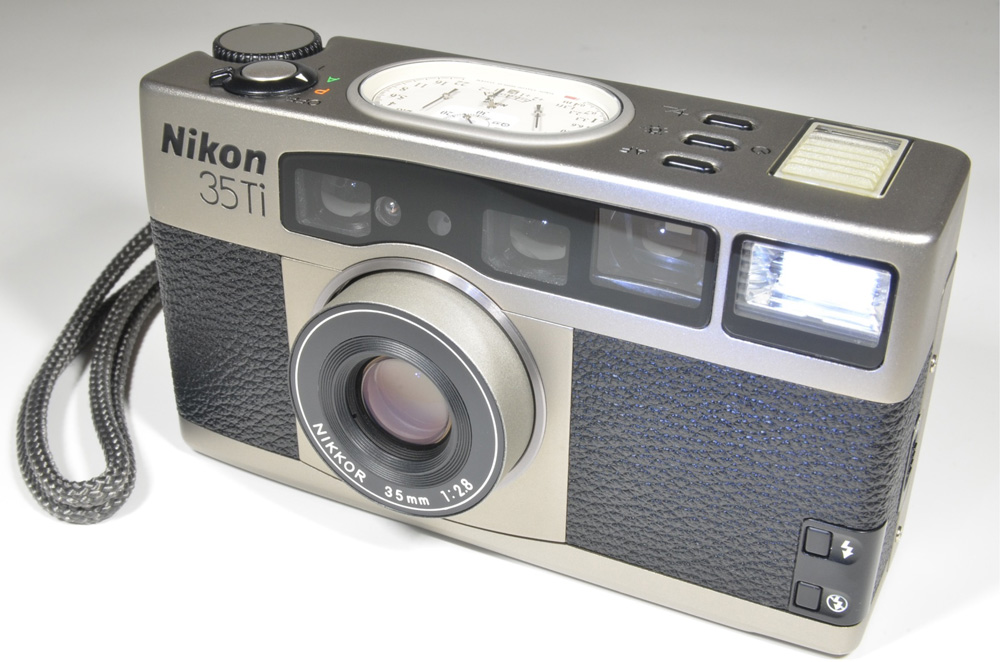
Nikon 35Ti

The point-and-shoot look is coming back in vogue and I personally favour the Nikon 35Ti. Point and shoot cameras use the less expensive 35mm film canisters (also referred to as 135 format film). These come in 24 or 36 exposures, and the cost of purchasing and processing film is less per frame than that of medium format film. The greatest benefit of the Nikon 35Ti is its amazing internal meter, which was ahead of its time compared to most film point and shoot cameras (the “6 segment 3D matrix metering”). Point and shoot cameras are intended to be used in Auto and this is why the quality of their meters is significant. The hand-watch-inspired top dials (designed by Seiko) are a treat to see and use.
I carry this during my travels. It fits in my pocket perfectly. The quality of the images I produce is gorgeous, and I believe I could also use it professionally at weddings (though I have not had it enough time to try this yet).
The only downside of most point and shoots is that they do not allow you to select ISO manually. Instead, they will read the ISO from the film’s DX code. Here is what all this means: when we shoot certain film stocks such as the Fuji 400h we opt to get as much light as possible. In essence we want to overexpose it by 1-2 stops. To make sure we get +1 more light, people came up with a hack, in order to trick their light meters so they give them settings that are not “proper” exposure, but +1 stop over. The easiest solution would of course be if light meters had an exposure compensation dial, but they do not, so what people do is the following trick:
If they are using a ISO400 film, they “lie” to their light meter by telling it that the film is less sensitive than it really is (they set ISO200, instead of ISO400 in their light meter’s settings). In this way, the light meter gives settings for less sensitive film. Instead of speed, say 1/250 (if the meter was set at ISO400), it now gives 1/125. Once you dial in 1/125 on your camera, the image is overexposed by +1 stop. This gives Fuji400h a lighter, less saturated, less contrasty look, with a beautiful palette shift.
You will often hear people ask “how do you rate Fuji400?”. They mean “what ISO are you setting on your lightmeter?” I rate my Fuji400 at 200, and Portra 400 at 400 (otherwise also called “box speed”).
The fact that you cannot select ISO manually on your point and shoot could be an inconvenience if you were using a film stock that requires you to consistently overexpose it (such as the Fuji 400h). Of course, you can always set the exposure compensation on the camera at +1 or +2! Luckily for us, the exposure compensation will not reset every time you switch off the camera (it only resets once you put a new film canister in). Realistically, though, the inability to manually set the ISO on the camera isn’t really a problem at all when using Portra 400. Portra 400 is wonderful without needing to overexpose it. And, in reality, Portra 400 is the most available professional filmstock we currently have since Fuji400h was discontinued. Also, if you really wanted to set the ISO manually, there is an easy hack to “scratch” the markings of the DX code on the film canister (the DX code is a set of black and silver markings on the film canister) but I personally have never felt the need to do this.
The camera you use changes the way you photograph.
The camera you use changes the way you photograph. I like this challenge of constant adaptation. I constantly look for things that limit me, so as to adapt to new aesthetics. My gear is something that really helps me adapt: I photograph differently when I hold my gigantic Pentax, or my point and shoot. I move differently, subjects reach differently to each, and I learn to look for different things to photograph. Somehow, my point and shoot is less threatening to people, and they become more playful in front of it, and so do I!
35mm SLR
Nikon F80 or F100

I personally love my Nikon F80 which has served me excellently as my travel camera. A very good alternative option is also the Nikon F100. I have it set on manual. I used to use an external metering but nowadays I either guess the correct exposure, or use the internal metering in spot meter and point it towards the inside of my palm (which I use as a “grey card”).
I find myself using this camera less and less in favour or my smaller point and shoot, the Nikon 35Ti. However, if you are looking for a less costly camera to start with film, this camera is highly recommended: it is almost as capable as a modern DSLR, the AF is fast and accurate, it is light, the metering is perfect, and loading and rewinding film is fool-proof. You can always start with it and then transition to a medium format camera and keep this as a backup.
The Olympus Trip 35

Other than these, I also own 4 more point and shoots, including the revered Olympus Trip 35, which was my childhood camera. It works with a selenium meter, which actually still works, requires no batteries, and is 100% mechanical! It has a wonderful, sharp lens and it is still fully functional after almost 35 years of owning it!


